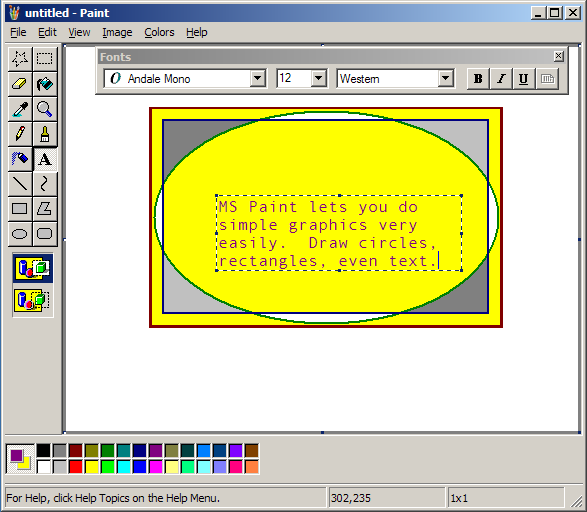
Microsoft includes with their Windows operating systems some simple accessories, programs that don't have a lot of features but can get you by in a pinch - WordPad, Notepad, a very simple calculator, and so on. For graphics, they include Paint. When you start Paint (from Accessories under Programs in the Start Menu), you should see a blank canvas (usually white) with a palette of colors below and a toolbox to the left. The toolbox contains the different painting tools you have available. Click on a tool in the toolbox to draw using that tool. The pencil tool lets you freehand draw. Click on the canvas to draw a point, or drag to scribble thinlines. The brush tool is similar to the pencil but allows for points or lines of various sizes or thickness. When you select it, a palette of brush shapes appears below the toolbox. | ||||||||||||
| ||||||||||||
MS Paint is good for drawing simple things, like small diagrams and simple icons. In a pinch, you can do somewhat more involved drawing projects in it, if you have patience. I once did a self-portrait using it (though if I had to do it over again I would get the Gimp and use that instead). MS Paint automatically saves in bitmap format (BMP), so you can use images that you create in it for your Windows wallpaper, as a texture for certain screensavers, and similar uses. Paint doesn't know how to save your image in icon format, though. For that you need IrfanView. |
IrfanView is mostly intended for just viewing images, but it has some additional features that can come in handy. It's a nice complement for MS Paint, because almost none of IrfanView's features overlap with features found in Paint. Format Conversions One thing IrfanView can do is convert between a wide variety of different graphics formats. IrfanView can take that GIF image that you downloaded from the internet and save it in bitmap (BMP) format so that you can edit it in Paint. IrfanView can then take your edited bitmap and convert it into icon format (ICO) so that you can use it to spice up a shortcut on your desktop. Or, take that JPEG image of the earth from space that you got from the NASA website and convert it to a bitmap (BMP) so that you can use it for wallpaper. To do a conversion format, open the image you want to convert using IrfanView (either by choosing Open from the File menu in IrfanView or by dragging the icon representing the image onto the IrfanView icon) and then choose Save As from the File menu. By "Save as type" will be a dropdown list. Change it to whatever format you want. | ||||
Color Adjustments IrfanView can also do basic color adjustments. This option can be very helpful if you have photographs that were taken under less-than-ideal lighting conditions. If the image is too dark or too red, you can maybe fix it up a little. Open your image in IrfanView, then pull down the Image menu and choose Enhance colors. The sliders on the left (brightness, contrast, and gamma correction) have to do with darkness and lightness. Increasing the brightness or the gamma correction will lighten up the image. (The difference between brightness and gamma correction is technical. Try them both and see which one works better for your image.) Contrast increases the difference between the light areas and the dark areas in the image. The three sliders on the right side let you adjust the overall color balance of the image. You can increase or decrease the amount of each primary color. To make your changes permanent, click Ok, pull down the File menu, and choose Save. |
The Gnu Image Manipulation Program (GIMP) is a full-featured image editor. Learning to use it takes some time, especially if you want to learn to use all of its features, but if you want to do any serious graphics editing, you'll need to learn a full-featured image editor. The Gimp's Windows The Gimp is made for working with several images at a time, and so in order to make the best use of screen space it doesn't place things like the toolbox in the window with each image. Instead, you'll have several windows. You can arrange them on the screen however you like. The Toolbox The toolbox window contains various tools you can use for editing images, much like the toolbox in MS Paint. Whatever tool you select in this toolbox, you can use that tool in any image window you have open. The toolbox also keeps your current working colors (double-click one to bring up a color selection dialog box), shows your active brush, pattern, and gradient, and has menus that allow you to open images and other windows (such as help). If you close the toolbox window, all of the Gimp will exit. Don't worry about the Xtns menu for now. Brush Selection If you double-click the current brush in the toolbox window, the brush selection window will open (if it isn't open already). Here you can pick your brush. Different brushes have different characteristics, which affect the way the different tools paint. For example, if you choose a large brush with hard edges and use the eraser tool, you'll erase a lot of stuff quickly, but if you choose a small brush with soft edges, you can do more gentle, gradual erasing, more like using a pencil eraser that leaves some faint marks behind. Tool Options The Tool Options window (available from the toolbox window's File menu under Dialogs) allows you to change some options that affect the way the tool you are using behaves. Different tools have different options, so whenever you select a different tool from the toolbox you'll see the tool options window show the options for that tool. For example, the paintbrush lets you set an opacity option, which controls how much it covers up what you're drawing over. Leave it at 100% to completely cover things up, or drop it closer to 0% to paint in a gentler overtone that lets everything under it show through. Several tools have this option, including the eraser. Other tools have their own options. The flip tool lets you choose whether to flip horizontally or vertically. The erase tool even has an Anti-Erase option, which lets you undo earlier erasing that you did. Image Windows & Menus Each image you have open will also have its own window. This is where you work with that image. If you right click on an image window, a set of menus will come up that will allow you to do various things with the image - save it, copy the current selection to the clipboard, shrink or grow the current selection, and so forth. Under the Image menu is where you do things like color adjustments. The Filters menu contains all sorts of goodies, more than we can go into in a basic course. Sometimes the filters can do a lot of your work for you. Experiment with some of them some time to see what they do. |
Layers, Channels, & Paths The Layers, Channels, & Paths window takes some getting used to, but it's really useful once you get the hang of it. For now, don't worry about channels and paths: layers will be enough to learn at first. If you don't see this window, pull down your toolbox window's File menu and look under Dialogs for Layers, Channels, & Paths. Layers are just what they sound like: your image can be drawn in layers, one over another. Wherever a layer is transparent or partly transparent, the layers underneath show through. Layers are really convenient for certain things. You can draw on one layer without changing the others, so if you decide that the bird you're drawing would look better in front of a different part of the background, you can just slide it over, and the background behind the bird is still there. Whichever layer you select in the Layers, Channels, & Paths window is the one you'll be working with in the image window. If you want to see what the image looks like without a certain layer, click the eye beside that layer to make it invisible. You can change it back to visible later. You can also change the order of the layers, moving them under or over one another. Select a layer and click the up and down arrow buttons. You can put the bird behind the tree, or in front of it. Maybe you want the bird behind the one branch, but in front of the rest of the tree... If you find that you need a new layer to draw on, click on the New Layer button (the one on the left that looks like a blank page). If you decide that you want to combine two layers into one, you can. Right-click on a layer and choose Merge Down, and it will be joined with the layer directly beneath it. Once you start editing the new combined layer though, it can be hard to reseparate them later. When you save an image, your layers are only preserved if you save in a format that supports them. In general, it's best to save your images in .xcf format, so that you can easily edit them more later. If you also need the image in another format (such as .bmp or .png or .gif), use Save As to create a copy, but if you have any more editing to do, open the .xcf version and edit that. When you get really comfortable with layers, you can achieve just exactly the image you want. Even those of us without graphic arts training can do amazing things with the Gimp and a little patience.
|