


|
|
Your computer communicates with you by using the monitor screen. Anything it wants you to know will appear somewhere on that screen. Any time you're not sure what to do, relax, sit back, and look over the whole screen for clues. After a while, you will learn which parts of the screen to look to for different kinds of information.
You talk to your computer using two devices: a keyboard and a mouse. The keyboard is mostly straightforward: you type in text with it. (There are other things you can do with the keyboard; we'll talk about some of them as we go.) The mouse is more complicated. With the mouse, you can point, click, doubleclick, and drag — with either the left or the right button. For now, don't worry about the right button; it's used for more advanced functions, and the left button is almost always the one you want. Practice getting the mouse pointer where you want it, then click. If a single click doesn't do enough, try a doubleclick. Note that if you move the mouse while clicking, Windows will interpret this as a drag operation — a more advanced function typically used for moving things around from one place to another.
Whenever your PC is running, the desktop is always there. It may be hidden behind something else, but in the background it's always there. The desktop consists of three main parts: the background, the taskbar, and a number of icons. We'll examine each of these items individually.
The background may be simple — a plain
colour — or may be painted with a more elaborate
wallpaper
picture. Often (but not
always) the background on a new PC will be a picture of a clouded sky
until the first time you change it. You can change the
background wallpaper in the Control Panel (more on that later).
![[Win95's Taskbar]](95taskbar.png)
The taskbar (shown above from Windows 95 and below from Windows XP)
appears along one edge of your screen. (On a new PC it is usually
along the bottom; you can move it to a different edge by dragging it
there, although you may have to unlock it first if you are using an
NT-based version.) Depending on your settings, the taskbar may always
be fully visible, or it may reduce itself to a thin line (called
autohide
) until you move the mouse pointer to that edge of the
screen. Either way, though, it's always there, as long as Windows is
running (although a console-mode application can obscure it). The
taskbar hosts three main things: the Start menu, a list of all your
open windows (the sample above shows Microsoft Works and an untitled
Paint document; the taskbar below shows a Mozilla document about
Getting Involved with something, an untitled Paint document, and a
Cygwin bash prompt) and the system tray. We'll talk about the Start
menu soon, as well as opening windows. The system tray is mostly a
more advanced thing, but it does have that handy clock in it, which
also shows the date if you hover the mouse pointer over it.
![[WinXP's Taskbar]](xptaskbar.png)
![]() Your desktop may be home to any number
of icons. (Several typical examples are shown.) These are usually shortcuts to various programs,
documents, or folders. (A folder is like a container, a storage location on your computer's disk,
where documents and other kinds of files can be stored.) Doubleclicking an icon on the desktop will
typically open a window; the exact nature of the window it will open depends on the shortcut. The
Your desktop may be home to any number
of icons. (Several typical examples are shown.) These are usually shortcuts to various programs,
documents, or folders. (A folder is like a container, a storage location on your computer's disk,
where documents and other kinds of files can be stored.) Doubleclicking an icon on the desktop will
typically open a window; the exact nature of the window it will open depends on the shortcut. The
My Computer
icon will open a window showing the various disks and drives in your computer.
The Recycle Bin
icon will open a window listing things you've thrown away recently. A folder
icon may open a folder window, which will contain icons for each of the things stored in that
folder. Technically speaking, each icon generally represents a file. (A folder is,
technically, a special kind of file.) By dragging an icon from one place to another, you can move
(or copy) that file from one folder or disk to another. Doubleclicking an icon will usually open
the file associated with that icon (assuming your computer knows how to open it; the details of how
that works (registry associations) are beyond the scope of this document).
![[Start menu from Windows 95]](start_menu_95.png)
![[Start menu from Win XP]](start_menu_xp_halfsize.png) We said earlier that the taskbar hosts the Start Menu. Normally the
start menu will be hidden in that little button with the word
We said earlier that the taskbar hosts the Start Menu. Normally the
start menu will be hidden in that little button with the word
Start
, but if you click that button, the whole menu pops out.
The start menu contains the Control Panel (under Settings in most
versions, or as a main entry in recent NT-based versions), which will
let you customise the system more to your liking, as well as the
Programs (or All Programs) submenus (which can have shortcuts, similar
to the icons on your desktop), and a number of other helpful items.
Advanced users can customise some of the content of this menu, but
some things (like Find
(or Search
in NT versions)) are
just always there. If you move your mouse up the Start menu to
Programs and either click there or just wait a couple of seconds,
you'll see that the menu expands to list shortcuts to various
applications, as well as some subcategories.
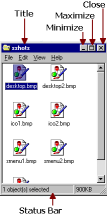
Now we come to the things that make Windows what it is: the actual windows themselves. Microsoft did not invent the concept of overlapping windows on the screen, but they have made them famous. A typical window is shown to the right, with several of the major parts labelled. The window's title is displayed in the title bar, at the top. You can reposition a window by dragging that title bar around the screen. If you click on the Maximize button, the window will expand to take up more of (or all of) the screen. (Click the same button again, and it should Restore to its former size.) The Minimize button will reduce the window to the taskbar. You won't see it on the screen, except in the taskbar, but it is technically still open, and if you click its taskbar entry it comes back to the front. Clicking on the Close button is a more drastic measure that should make the window go away entirely, if you're finished with it. Almost all windows have these things in common, although a few very simple or special windows may not.
This window also has a status bar (which gives additional
information), a menu bar (more on these in a moment), a scrollbar
(good for displaying what doesn't fit in the window at first), and a
number of icons (which represent files — in this case,
some bitmap
images).
Many windows have a menu bar, just below the title bar.
Tip: Some of the commands in these menus have shortcut key
combinations listed to the right. If you get tired of pulling that
menu down for the same command all the time, you can learn that
keyboard shortcut and save yourself a few seconds each time. For
example, if the Save command has the shortcut Ctrl-S
, you can
hold Ctrl and press S, and presto, your document is saved, without
even reaching for the File menu.
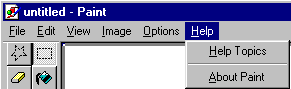
Each word on the menu bar will, if clicked, pull down
(that is, expand)
into a menu — a list of various commands and/or submenus.
Here you can see that we have pulled down the Help menu for this
window to reveal its choices (in this case, Help Topics
and
About Paint
). The menu on the left is almost always the File
menu — this is where you open and save documents (known to
your computer as files), and it's also where you exit most
applications. The menu on the right is almost always the Help
menu — sometimes it is really helpful, and sometimes not,
but it's almost always there. There is usually an About entry in the
Help menu, which will tell you what application the window belongs to,
and what version of that application you have. There will be other
menus in between File and Help, which will vary from one kind of
window to another. In many cases the second menu will be the Edit
menu; if so, there will probably be Cut, Copy, and Paste commands
there, and possibly Undo. (The Word Processing class covers Cut,
Copy, and Paste in more detail, among other things.)
Show Desktopicon that resides in the taskbar's quicklaunch area. (Recent NT versions also have this feature, but only if you turn it on in the control panel settings.)
Any application that you install on your computer (or that came preinstalled when you bought the computer) will usually put a shortcut icon for itself either on your desktop or in your start menu — sometimes both places. You can start the application by clicking its entry in the start menu or by doubleclicking its shortcut icon on the desktop. (There are at least three other ways to start an application, but these two ways are the easiest to learn.)
In the start menu, you'll find the settings menu. (In WinXP, you
just see Control Panel
.) Here's where you can change a number
of settings that impact how your whole computer operates. For
example, the Display section of the control panel (under
Appearances and Themes
in WinXP) will let you change your
desktop's background, your screen saver settings, and the colors that
all your applications use. Fooling around in the settings, you can
swap your mouse buttons, set your computer to play funny sounds when
you open and close windows, increase the resolution (so you can see
more things at once), decrease the resolution (so you don't have to
squint), change the date and time on your computer's clock, and so on.
Some of these settings are actually useful, and others are merely
amusing. (A few can even be risky: stay away from Add New Hardware
unless you really have new hardware installed.) You can also add
things to (and remove things from) the Start Menu — look in
the Taskbar settings. (The taskbar settings are directly under the
Settings item in the Start Menu, rather than inside the Control Panel,
except in Windows XP, where they are under Appearances and
Themes.)
There are a number of really common things that people do with computers: type papers, browse the world wide web, paint pictures, and so on. For the things you do most, you'll probably want to download (or buy) an application designed for those things, but if you only do something once in a while, you may find a simple app that will get you by, already installed on your system. Windows comes with a number of simple apps: a calendar, a calculator, a word processor (Write or WordPad), a text editor (Notepad), a drawing program (Paint), a CD player, and so on. Many of these can be found in the Accessories folder (under Programs in the Start Menu). Once again, these are very simple applications, without many features, a dim shadow of the much better applications that are available for download or for purchase. But the Accessories will get you by in a pinch if you need to do something and haven't installed a good application for doing it yet.
Ever get the feeling that you should be able to do something else here, but you don't see an option for it? Try the right mouse button, and see what new options appear. For example, in your web browser, right-clicking may let you save a copy of that picture, or open that link in a separate tab. When you drag a file from one window to another with the left button, you usually move it, but if you right-drag, you get options to move it, copy it, or create a shortcut link to it. This may seem overwhelming now, but remember that right button: when you're ready to go beyond the basics, you'll be glad it's there.
Another more advanced mouse operation is ctrl-clicking or shift-clicking. Many situations that require you to select an item from a list (or select an icon from a window full of them) will actually allow you to select more than one. If you hold Ctrl while clicking, you can leave the already-selected one(s) selected, while selecting an additional one. That is, click the first one, then hold Ctrl while clicking each of the others, and you can select several. Shift-clicking is similar, but instead of selecting individual items it selects a range. If you click the first item, then hold shift while clicking the last item, you will have selected all the items in between as well.